 Arduino(傾儖僪僁僀乕僲)墘廗嶲徠傾僪儗僗
丂Arduino(傾儖僪僁僀乕僲)墘廗偼壓婰偺傾僪儗僗傪嶲徠偟傑偡丅
https://www.arduino.cc/en/Tutorial/HomePage
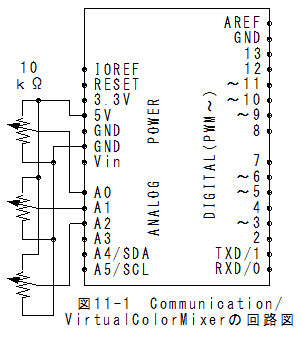
Communication/VirtualColorMixer偺夞楬恾丂Communication/VirtualColorMixer偺夞楬恾偼埲壓偲側傝傑偡丅
 Communication/VirtualColorMixer偺僗働僢僠
乮侾乯儊僯儏乕偺乽僼傽僀儖乿丵乽僗働僢僠偺椺乿丵乽Communication乿丵乽VirtualColorMixer乿偱埲壓偺僗働僢僠偑愝掕偝傟傑偡丅
/*
 VirtualColorMixer
  This example reads three analog sensors (potentiometers are easiest)
 and sends their values serially. The Processing and Max/MSP programs at the bottom
 take those three values and use them to change the background color of the screen.

 The circuit:
 * potentiometers attached to analog inputs 0, 1, and 2
 http://www.arduino.cc/en/Tutorial/VirtualColorMixer
 created 2 Dec 2006
 by David A. Mellis
 modified 30 Aug 2011
 by Tom Igoe and Scott Fitzgerald

  This example code is in the public domain.
 */

const int redPin = A0;		// sensor to control red color
const int greenPin = A1;	// sensor to control green color
const int bluePin = A2;		// sensor to control blue color

void setup()
{
  Serial.begin(9600);
}

void loop()
{
  Serial.print(analogRead(redPin));
  Serial.print(",");
  Serial.print(analogRead(greenPin));
  Serial.print(",");
  Serial.println(analogRead(bluePin));
}

/* Processing code for this example

//  This example code is in the public domain.

 import processing.serial.*;

 float redValue = 0;        // red value
 float greenValue = 0;      // green value
 float blueValue = 0;       // blue value

 Serial myPort;

 void setup() {
 size(200, 200);

 // List all the available serial ports
 // if using Processing 2.1 or later, use Serial.printArray()
 println(Serial.list());

 // I know that the first port in the serial list on my mac
 // is always my  Arduino, so I open Serial.list()[0].
 // Open whatever port is the one you're using.
 myPort = new Serial(this, Serial.list()[0], 9600);
 // don't generate a serialEvent() unless you get a newline character:
 myPort.bufferUntil('\n');
 }

 void draw() {
 // set the background color with the color values:
 background(redValue, greenValue, blueValue);
 }

 void serialEvent(Serial myPort) {
 // get the ASCII string:
 String inString = myPort.readStringUntil('\n');

 if (inString != null) {
 // trim off any whitespace:
 inString = trim(inString);
 // split the string on the commas and convert the
 // resulting substrings into an integer array:
 float[] colors = float(split(inString, ","));
 // if the array has at least three elements, you know
 // you got the whole thing.  Put the numbers in the
 // color variables:
 if (colors.length >=3) {
 // map them to the range 0-255:
 redValue = map(colors[0], 0, 1023, 0, 255);
 greenValue = map(colors[1], 0, 1023, 0, 255);
 blueValue = map(colors[2], 0, 1023, 0, 255);
 }
 }
 }
 */

/* Max/MSP patch for this example
 ----------begin_max5_patcher----------
1512.3oc4Z00aaaCE8YmeED9ktB35xOjrj1aAsXX4g8xZQeYoXfVh1gqRjdT
TsIsn+2K+PJUovVVJ1VMdCAvxThV7bO7b48dIyWtXxzkxaYkSA+J3u.Sl7kK
lLwcK6MlT2dxzB5so4zRW2lJXeRt7elNy+HM6Vs61uDDzbOYkNmo02sg4euS
4BSede8S2P0o2vEq+aEKU66PPP7b3LPHDauPvyCmAvv4v6+M7L2XXF2WfCaF
lURgVPKbCxzKUbZdySDUEbgABN.ia08R9mccGYGn66qGutNir27qWbg8iY+7
HDRx.Hjf+OPHCQgPdpQHoxhBlwB+QF4cbkthlCRk4REnfeKScs3ZwaugWBbj
.PS+.qDPAkZkgPlY5oPS4By2A5aTLFv9pounjsgpnZVF3x27pqtBrRpJnZaa
C3WxTkfUJYA.BzR.BhIy.ehquw7dSoJCsrlATLckR.nhLPNWvVwL+Vp1LHL.
SjMG.tRaG7OxT5R2c8Hx9B8.wLCxVaGI6qnpj45Ug84kL+6YIM8CqUxJyycF
7bqsBRULGvwfWyRMyovElat7NvqoejaLm4f+fkmyKuVTHy3q3ldhB.WtQY6Z
x0BSOeSpTqA+FW+Yy3SyybH3sFy8p0RVCmaMpTyX6HdDZ2JsPbfSogbBMueH
JLd6RMBdfRMzPjZvimuWIK2XgFA.ZmtfKoh0Sm88qc6OF4bDQ3P6kEtF6xej
.OkjD4H5OllyS+.3FlhY0so4xRlWqyrXErQpt+2rsnXgQNZHZgmMVzEofW7T
S4zORQtgIdDbRHrObRzSMNofUVZVcbKbhQZrSOo934TqRHIN2ncr7BF8TKR1
tHDqL.PejLRRPKMR.pKFAkbtDa+UOvsYsIFH0DYsTCjqZ66T1CmGeDILLpSm
myk0SdkOKh5LUr4GbWwRYdW7fm.BvDmzHnSdH3biGpSbxxDNJoGDAD1ChH7L
I0DaloOTBLvkO7zPs5HJnKNoGAXbol5eytUhfyiSfnjE1uAq+Fp0a+wygGwR
q3ZI8.psJpkpJnyPzwmXBj7Sh.+bNvVZxlcKAm0OYHIxcIjzEKdRChgO5UMf
LkMPNN0MfiS7Ev6TYQct.F5IWcCZ4504rGsiVswGWWSYyma01QcZgmL+f+sf
oU18Hn6o6dXkMkFF14TL9rIAWE+6wvGV.p.TPqz3HK5L+VxYxl4UmBKEjr.B
6zinuKI3C+D2Y7azIM6N7QL6t+jQyZxymK1ToAKqVsxjlGyjz2c1kTK3180h
kJEYkacWpv6lyp2VJTjWK47wHA6fyBOWxH9pUf6jUtZkLpNKW.9EeUBH3ymY
XSQlaqGrkQMGzp20adYSmIOGjIABo1xZyAWJtCX9tg6+HMuhMCPyx76ao+Us
UxmzUE79H8d2ZB1m1ztbnOa1mGeAq0awyK8a9UqBUc6pZolpzurTK232e5gp
aInVw8QIIcpaiNSJfY4Z+92Cs+Mc+mgg2cEsvGlLY6V+1kMuioxnB5VM+fsY
9vSu4WI1PMBGXye6KXvNuzmZTh7U9h5j6vvASdngPdgOFxycNL6ia1axUMmT
JIzebXcQCn3SKMf+4QCMmOZung+6xBCPLfwO8ngcEI52YJ1y7mx3CN9xKUYU
bg7Y1yXjlKW6SrZnguQdsSfOSSDItqv2jwJFjavc1vO7OigyBr2+gDYorRk1
HXZpVFfu2FxXkZtfp4RQqNkX5y2sya3YYL2iavWAOaizH+pw.Ibg8f1I9h3Z
2B79sNeOHvBOtfEalWsvyu0KMf015.AaROvZ7vv5AhnndfHLbTgjcCK1KlHv
gOk5B26OqrXjcJ005.QqCHn8fVTxnxfj93SfQiJlv8YV0VT9fVUwOOhSV3uD
eeqCUClbBPa.j3vWDoMZssNTzRNEnE6gYPXazZaMF921syaLWyAeBXvCESA8
ASi6Zyw8.RQi65J8ZsNx3ho93OhGWENtWpowepae4YhCFeLErOLENtXJrOSc
iadi39rf4hwc8xdhHz3gn3dBI7iDRlFe8huAfIZhq
-----------end_max5_patcher-----------
 */
Communication/VirtualColorMixerl偺幚峴乮侾乯儊僯儏乕偺乽僗働僢僠乿丵乽儅僀僐儞儃乕僪偵彂偒崬傓乿偱彂崬傒偝傟丄幚峴偝傟傑偡丅
乮俀乯Processing乮僾儘僙僔儞僌乯丂俆復丗Arduino墘廗Communication/VirtualColorMixer梡僗働僢僠傪幚峴偟傑偡丅
乮俁乯Arduino偵愙懕偟偨3屄偺儃儕儏僂儉傪夞偡偲僂僀儞僪僂偺怓偑曄壔偟傑偡丅
Communication/VirtualColorMixerl傑偲傔乮侾乯Communication/VirtualColorMixer偱偼丄僂僀儞僪僂偺怓偺惂屼偑棟夝偱偒傑偡丅
 侾俀復丗Arduino(傾儖僪僁僀乕僲)墘廗乮Communication/SerialCallResponse曇乯偵峴偔丅