 Arduino(傾儖僪僁僀乕僲)墘廗嶲徠傾僪儗僗
丂Arduino(傾儖僪僁僀乕僲)墘廗偼壓婰偺傾僪儗僗傪嶲徠偟傑偡丅
https://www.arduino.cc/en/Tutorial/HomePage
Control/IfStatementConditional偺夞楬恾丂Control/IfStatementConditional偺夞楬恾偼埲壓偲側傝傑偡丅
 Control/IfStatementConditional偺僗働僢僠
乮侾乯儊僯儏乕偺乽僼傽僀儖乿丵乽僗働僢僠偺椺乿丵乽Control乿丵乽IfStatementConditional乿 偱埲壓偺僗働僢僠偑愝掕偝傟傑偡丅
/*
IfStatementConditional
Conditionals - If statement
This example demonstrates the use of if() statements.
It reads the state of a potentiometer (an analog input) and turns on an LED
only if the potentiometer goes above a certain threshold level. It prints the analog value
regardless of the level.
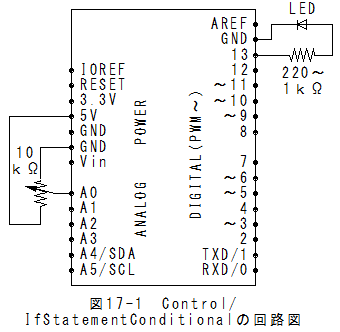
The circuit:
* potentiometer connected to analog pin 0.
Center pin of the potentiometer goes to the analog pin.
side pins of the potentiometer go to +5V and ground
* LED connected from digital pin 13 to ground
* Note: On most Arduino boards, there is already an LED on the board
connected to pin 13, so you don't need any extra components for this example.
created 17 Jan 2009
modified 9 Apr 2012
by Tom Igoe
This example code is in the public domain.
http://www.arduino.cc/en/Tutorial/IfStatement
*/
// These constants won't change:
const int analogPin = A0; // pin that the sensor is attached to
const int ledPin = 13; // pin that the LED is attached to
const int threshold = 400; // an arbitrary threshold level that's in the range of the analog input
void setup() {
// initialize the LED pin as an output:
pinMode(ledPin, OUTPUT);
// initialize serial communications:
Serial.begin(9600);
}
void loop() {
// read the value of the potentiometer:
int analogValue = analogRead(analogPin);
// if the analog value is high enough, turn on the LED:
if (analogValue > threshold) {
digitalWrite(ledPin, HIGH);
}
else {
digitalWrite(ledPin, LOW);
}
// print the analog value:
Serial.println(analogValue);
delay(1); // delay in between reads for stability
}
Control/IfStatementConditional偺幚峴乮侾乯儊僯儏乕偺乽僗働僢僠乿丵乽儅僀僐儞儃乕僪偵彂偒崬傓乿偱彂崬傒偝傟丄幚峴偝傟傑偡丅
乮俀乯儊僯儏乕偺乽僣乕儖乿丵乽僔儕傾儖儌僯僞乿傪慖戰偡傞偲僔儕傾儖儌僯僞偑昞帵偝傟傑偡丅
乮俁乯僔儕傾儖儌僯僞偵偼A0僺儞偺揹埑儗儀儖偑昞帵偝傟傑偡丄
乮係乯儃儕儏僂儉傪夞偟偰丄揹埑儗儀儖偑400埲忋偵側傞偲LED偑揰摂偟傑偡丅
Control/IfStatementConditionall傑偲傔乮侾乯if暥偺墘廗偱偡丅
 侾俉復丗Arduino(傾儖僪僁僀乕僲)墘廗乮Control/ForLoopIterationl曇乯偵峴偔丅