 Arduino(傾儖僪僁僀乕僲)墘廗嶲徠傾僪儗僗
丂Arduino(傾儖僪僁僀乕僲)墘廗偼壓婰偺傾僪儗僗傪嶲徠偟傑偡丅
https://www.arduino.cc/en/Tutorial/HomePage
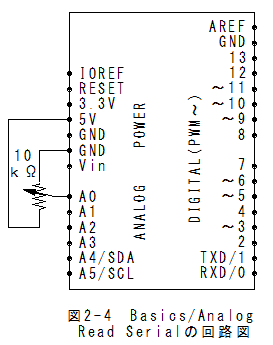
Control/SwitchCase偺夞楬恾丂Basics/Analog Read Serial偺夞楬恾偲摨堦偵側傝傑偡丅
 Control/SwitchCase偺僗働僢僠
乮侾乯儊僯儏乕偺乽僼傽僀儖乿丵乽僗働僢僠偺椺乿丵乽Control乿丵乽SwitchCase乿 偱埲壓偺僗働僢僠偑愝掕偝傟傑偡丅
/*
  SwitchCase
  Switch statement

 Demonstrates the use of a switch statement.  The switch
 statement allows you to choose from among a set of discrete values
 of a variable.  It's like a series of if statements.

 To see this sketch in action, but the board and sensor in a well-lit
 room, open the serial monitor, and and move your hand gradually
 down over the sensor.

 The circuit:
 * photoresistor from analog in 0 to +5V
 * 10K resistor from analog in 0 to ground

 created 1 Jul 2009
 modified 9 Apr 2012
 by Tom Igoe
 This example code is in the public domain.
 http://www.arduino.cc/en/Tutorial/SwitchCase
 */

// these constants won't change. They are the
// lowest and highest readings you get from your sensor:
const int sensorMin = 0;      // sensor minimum, discovered through experiment
const int sensorMax = 600;    // sensor maximum, discovered through experiment

void setup() {
  // initialize serial communication:
  Serial.begin(9600);
}

void loop() {
  // read the sensor:
  int sensorReading = analogRead(A0);
  // map the sensor range to a range of four options:
  int range = map(sensorReading, sensorMin, sensorMax, 0, 3);

  // do something different depending on the
  // range value:
  switch (range) {
    case 0:    // your hand is on the sensor
      Serial.println("dark");
      break;
    case 1:    // your hand is close to the sensor
      Serial.println("dim");
      break;
    case 2:    // your hand is a few inches from the sensor
      Serial.println("medium");
      break;
    case 3:    // your hand is nowhere near the sensor
      Serial.println("bright");
      break;
  }
  delay(1);        // delay in between reads for stability
}
Control/SwitchCase偺幚峴乮侾乯儊僯儏乕偺乽僗働僢僠乿丵乽儅僀僐儞儃乕僪偵彂偒崬傓乿偱彂崬傒偝傟丄幚峴偝傟傑偡丅
乮俀乯儊僯儏乕偺乽僣乕儖乿丵乽僔儕傾儖儌僯僞乿傪慖戰偡傞偲僔儕傾儖儌僯僞偑昞帵偝傟傑偡丅
乮俁乯儃儕儏僂儉傪夞偡偲僔儕傾儖儌僯僞偺抣偑"dark"仺"dim"仺"medium"仺"bright"偺弴偵曄壔偟傑偡丅
Control/SwitchCase傑偲傔乮侾乯SwitchCase暥偺墘廗偱偡丅
 俀俀復丗Arduino(傾儖僪僁僀乕僲)墘廗乮Strings/StringAdditionOperator曇乯偵峴偔丅