 Arduino(傾儖僪僁僀乕僲)墘廗嶲徠傾僪儗僗
丂Arduino(傾儖僪僁僀乕僲)墘廗偼壓婰偺傾僪儗僗傪嶲徠偟傑偡丅
https://www.arduino.cc/en/Tutorial/HomePage
Communication/SwitchStatementSerialInput偺夞楬恾丂Communication/SwitchStatementSerialInput偺夞楬恾偼埲壓偲側傝傑偡丅
 Communication/SwitchStatementSerialInput偺僗働僢僠
乮侾乯埲壓偺僗働僢僠傪愝掕偟傑偡丅
/*
Switch statement with serial input
Demonstrates the use of a switch statement. The switch
statement allows you to choose from among a set of discrete values
of a variable. It's like a series of if statements.
To see this sketch in action, open the Serial monitor and send any character.
The characters a, b, c, d, and e, will turn on LEDs. Any other character will turn
the LEDs off.
The circuit:
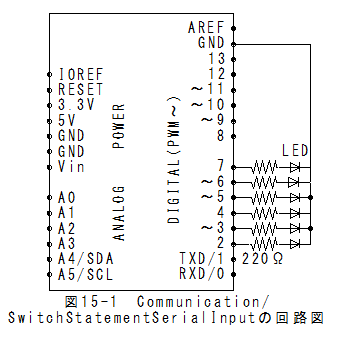
* 5 LEDs attached to digital pins 2 through 6 through 220-ohm resistors
created 1 Jul 2009
by Tom Igoe
This example code is in the public domain.
http://www.arduino.cc/en/Tutorial/SwitchCase2
*/
void setup() {
// initialize serial communication:
Serial.begin(9600);
// initialize the LED pins:
for (int thisPin = 2; thisPin < 7; thisPin++) {
pinMode(thisPin, OUTPUT);
}
}
void loop() {
// read the sensor:
if (Serial.available() > 0) {
int inByte = Serial.read();
// do something different depending on the character received.
// The switch statement expects single number values for each case;
// in this exmaple, though, you're using single quotes to tell
// the controller to get the ASCII value for the character. For
// example 'a' = 97, 'b' = 98, and so forth:
switch (inByte) {
case 'a':
digitalWrite(2, HIGH);
break;
case 'b':
digitalWrite(3, HIGH);
break;
case 'c':
digitalWrite(4, HIGH);
break;
case 'd':
digitalWrite(5, HIGH);
break;
case 'e':
digitalWrite(6, HIGH);
break;
default:
// turn all the LEDs off:
for (int thisPin = 2; thisPin < 7; thisPin++) {
digitalWrite(thisPin, LOW);
}
}
}
}
Communication/SwitchStatementSerialInput偺幚峴乮侾乯儊僯儏乕偺乽僗働僢僠乿丵乽儅僀僐儞儃乕僪偵彂偒崬傓乿偱彂崬傒偝傟丄幚峴偝傟傑偡丅
乮俀乯儊僯儏乕偺乽僣乕儖乿丵乽僔儕傾儖儌僯僞乿傪慖戰偡傞偲僔儕傾儖儌僯僞偑昞帵偝傟傑偡丅
乮俁乯僔儕傾儖儌僯僞偵夵峴柍偟傪愝掕偟傑偡丅
乮係乯僔儕傾儖儌僯僞偺憲怣僥僉僗僩儃僢僋僗偵乽a乿傪愝掕偟傑偡丅
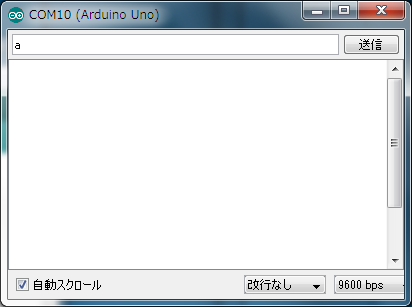
乮俆乯憲怣儃僞儞傪墴偟傑偡丅
乮俈乯僺儞2偺LED偑揰摂偟傑偡丅
Communication/SwitchStatementSerialInputl傑偲傔乮侾乯 switch暥偺楙廗偱偡丅
 侾俇復丗Arduino(傾儖僪僁僀乕僲)墘廗乮Communication/MIDI曇乯偵峴偔丅