 Arduino演習Communication/Physical Pixel用スケッチ
Arduino演習Communication/Physical Pixel用スケッチは以下となります。
 // mouseover serial

 // Demonstrates how to send data to the Arduino I/O board, in order to
 // turn ON a light if the mouse is over a square and turn it off
 // if the mouse is not.
 // created 2003-4
 // based on examples by Casey Reas and Hernando Barragan
 // modified 30 Aug 2011
 // by Tom Igoe
 // This example code is in the public domain.

 import processing.serial.*;

 float boxX;
 float boxY;
 int boxSize = 20;
 boolean mouseOverBox = false;

 Serial port;

 void setup() {
 size(200, 200);
 boxX = width/2.0;
 boxY = height/2.0;
 rectMode(RADIUS);

 // List all the available serial ports in the output pane.
 // You will need to choose the port that the Arduino board is
 // connected to from this list. The first port in the list is
 // port #0 and the third port in the list is port #2.
 // if using Processing 2.1 or later, use Serial.printArray()
 println(Serial.list());

 // Open the port that the Arduino board is connected to (in this case #0)
 // Make sure to open the port at the same speed Arduino is using (9600bps)
 port = new Serial(this, Serial.list()[4], 9600);

 }

 void draw()
 {
   background(0);

   // Test if the cursor is over the box
   if (mouseX > boxX-boxSize && mouseX < boxX+boxSize && mouseY > boxY-boxSize && mouseY < boxY+boxSize)
   { mouseOverBox = true;
     // draw a line around the box and change its color:
     stroke(255);
     fill(153);
     // send an 'H' to indicate mouse is over square:
     port.write('H');
   }
   else
   {
     // return the box to it's inactive state:
     stroke(153);
     fill(153);
     // send an 'L' to turn the LED off:
     port.write('L');
     mouseOverBox = false;
   }
   // Draw the box
   rect(boxX, boxY, boxSize, boxSize);
 }
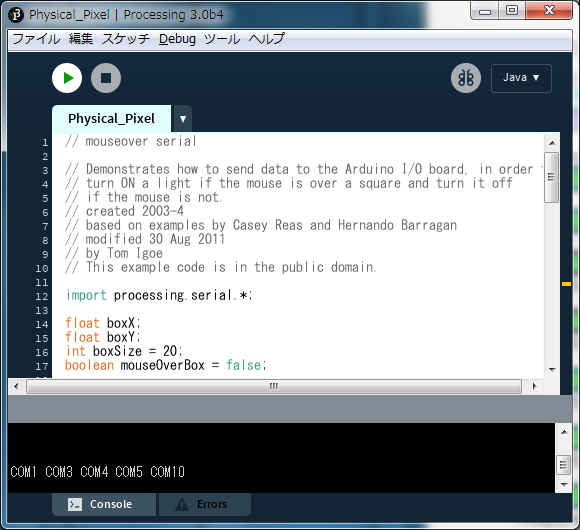
PArduino演習Communication/Physical Pixel用スケッチの実行(1)PArduino演習Communication/Physical Pixel用スケッチを実行するとコンソールに
COM1 COM3 COM4 COM5 COM10
と表示されます。
(2)Arduinoと接続のポートはいつもCOM10であり、port = new Serial(this, Serial.list()[4], 9600);とするとつながります。
(4)実行ウインドウが表示されます。
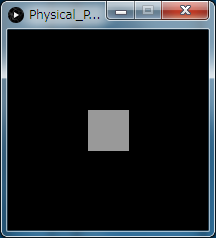
(5)マウスの位置が中央の四角(灰色)内にはいるとArduinoに接続したLEDが点灯します。
(6)マウスの位置が中央の四角(灰色)内からはずれるとArduinoに接続したLEDが消灯します。
Arduino演習Communication/Physical Pixe用スケッチまとめ(1)トラブルなく動作しました。
(2)Communication/Physical Pixelはマウスの位置の判定方法の例題です。
 5章:Arduino演習Communication/VirtualColorMixer用スケッチに行く。